Image Map
Showing posts with label vegetarian. Show all posts

Monday, 17 December 2018

Spiced Christmas Cake and Mulled Apple Juice.


  1. I made these recently for my Christmas Kirtan and Cake event in my new Yoga Studio. As I didn't know who was coming I wanted to have a cake that was vegan, gluten free and nut free so everyone could have some regardless of their dietary requirements. Of course I wanted something seasonal too and so these were the perfect choice.

  2. If you're not vegan, gluten intolerant or have a nut allergy you can use whole milk, butter, plain flour or ground almonds. I'll leave that up to you. 
  3. I served this with some warm mulled 'cider' which was the perfect addition on a cold, winter's night. Both recipes below.

Cakes:

Ingredients:
115g treacle / molasses
115g golden syrup
115g butter or butter alternative
275ml full fat coconut milk or whole milk
115g dark brown sugar
225g gluten-free / plain flour
1 1/2 tsp baking powder
1 inch fresh ginger grated
1 tsp ground cinnamon
1 tsp ground nutmeg
1 tsp mixed spice 

Method:

Pre-heat the oven to 180 degrees / gas mark 4

Heat the milk, sugar, butter, golden syrup and molasses gently in a pan on a low heat until it has combined fully and is runny. Don't let it boil. 

Add the grated fresh ginger, stir well and set aside.

Mix the flour, baking powder, mixed spice, nutmeg and cinnamon.

Add the wet mixture to the dry and mix well. It should be the consistency of heavy cream.

Add the mixture to lined cases, 3/4 full.

Bake in a pre-heated oven for 12-15 minutes until they are cooked through.

Set aside to cool on a wire rack. Dust with icing sugar or drizzle with icing.

Enjoy!


Mulled 'Cider':

2L of pressed Apple Juice 
1 cinnamon stick 
2 star anise 
8 cardamom pods
2 oranges in wedges 
4-5 cloves in each wedge

Allow to heat in a pan on a low heat or in a slow cooker.

Serve warm with good company!


Tuesday, 11 September 2018

Autumnal Spiced Fruit Buns - Gluten and Dairy Free

Apple and Blackberry cake recipe:

There is an abundance of apples and blackberries at the moment. I aim to eat seasonally and locally, not to mention it's free food! Zero air miles, zero carbon footprint and as fresh as can be. From tree to cake in under an hour.


Ingredients:
Makes 12
4 free range, organic eggs beaten
1/2 cup of cane sugar/honey/maple syrup
200g (1 and 1/4 cups) of ground almonds or other gluten free flour
1 teaspoon of baking powder
2 dashes of Olive oil
Teaspoon of cinnamon
Teaspoon of nutmeg
Pinch of salt
Chopped apples and blackberries 


Method:
Preheat oven to 180 degrees/gas mark 4
Mix eggs, oil and sugar together well.

Add in flour, salt, baking powder and spices.
Line a baking tray and fill the bottom of each case with mixture.
Sprinkle in chopped seasonal fruit
Cover with mixture so cases are about 3/4 full
Bake for 15 mins at 180 degrees/gas mark 4
Allow to cool on a wire rack.
Enjoy!


Dietary Information:
These buns are gluten free, high in protein (for a cake!), dairy free, vegetarian.


Storage Instructions:
If they last you can keep these in the fridge for a day or two.


Protein Balls - low in sugar

I made these Protein balls for my Food and Yoga Trail in Cork City recently (more details here) and they went down a storm. Many protein ball recipes contain artificial or refined protein powder and are often high in natural sugars using dates and sweeteners. So I wanted to create ones that were high in protein naturally and sweetened naturally. 


As always I didn't follow a specific recipe just made it up as I went along but below is what I've figured to be the best combination.

Ingredients:
1.5 cups of Irish, Organic Oats
2 heaped tablespoons of chia seeds
3 heaped tablespoons of milled flax seeds
3 heaped tablespoons of local, organic honey
3 heaped tablespoons of nut butter
3 heaped tablespoons of roasted buckwheat
3 heaped tablespoons of Cacao nibs
Some oat milk/water to get consistency

Method:
Put all of the above in a bowl and mix well. 
Roll into balls and place in the fridge. I've found it helpful to wet the hands slightly to make this easier.
Optional to dip in dark chocolate or sprinkle. You could also roll them in coconut or other chopped seeds/nuts when wet.


Prep Time:
These take just a few minutes to measure and mix the ingredients and then some time to roll into balls. 

Dietary Information:
These are naturally gluten free, sugar free, vegan (use agave syrup instead of honey), raw and tasty I swear!

The flax, chia and nut butter are high in proteins.

Storage Instructions:

These will keep well in the fridge and so handy for a snack or treat on the go, that's if they last!
Enjoy!


Friday, 20 January 2017

Notella - A Nutella alternative


You may have seen lots of articles in the press of late about how Nutella is potentially Carcinogenic (cancer causing). If you missed it read more HERE.

Whether the claims are true or not the fact is Nutella contains Palm Oil. This is a highly processed, unnatural and cheap oil that is used in many processed foods. Cheaper than olive oil and other natural fats, vast areas of rain forests in South America and Asia have been destroyed so multi billion dollar corporations can get even cheaper ingredients to make even unhealthier foods. Cancer or not AVOID PALM OIL like the plague. Even if it says 'Sustain-ably sourced Palm Oil' it just means they replant the trees but still wildlife and natural habitats are being destroyed.

Palm oil or not Nutella is so laden with sugar it should be avoided regardless. I myself have been known to eat it by the spoon full, spread it thickly on crackers, pancakes and bread as a treat and we all know once the jar is open...it needs to be finished. Even though judging by the sugar content I don't think this spread would ever go off. Even decades later!

So this news lead me to think about how you could make a more natural, just as tasty substitute without breaking the bank. Here it is my Notella recipe. Simple, quick and tastes so good. You can make a batch in advance and keep it in the fridge if you like the texture hard or at room temperature if you want it more spreadable.


Now don't be fooled this recipe should also be treated as just that, a treat. Try not to eat this by the spoonful (this is where I struggle!) as it is high in fats (good fats but still high!) and calories. However, I would want this over Nutella any day!


Ingredients:
2 heaped tea spoons of Nut butter of choice (I use Merian as it is Palm Oil free!)
1 dash of Olive Oil/Coconut Oil/Oil of choice (try and always get cold pressed, extra virgin oils)
1 teaspoon of honey (more if you don't mind the calories and want it sweeter), use Mayple Syrup to make it vegan
4 squares of 85% + Coco chocolate.

Method:
Using a small pan on a very low heat add the dash or oil (if you want a thicker consistency don't us any oil, providing you have a non stick pan). Add the rest of the ingredients and stir well until the chocolate is fully melted. 
Transfer into a clean jar or eat directly from the pot (No I have never done this I swear...)

Prep time:
1 minute to gather ingredients

Cooking time:
2-3 minutes to melt and stir

Dietary Information:
Refined Sugar free
Dairy free (if you use high % chocolate)
Gluten Free
Wheat Free
Vegetarian
Vegan
Paleo (if you don't use peanut butter)
Dark Chocolate is high in antioxidants and good fats
Local, organic honey can lessen effects of hayfever 
Nuts are high in EFA (essential fatty acids)
Better than Nutella!


Storage Instructions:
If it lasts then it can be kept in a sealed container in the fridge or at room temperature ready for spreading! I don't think this will ever last the time it would take it to go off!

So there you have it Jeanies! Hopefully you have been inspired to check ingredients on the packets of processed foods you eat (If it's in a packet and has ingredients then yes it is processed!) and avoid any more suffering for forests, wildlife, local people, extra weight from eating this sugary goodness and also potential carcinogenic effects.


Thursday, 18 August 2016

Healing Rice


I love rice! Plain and simple I think it's a great staple to have in the cupboard. Cheap, easy and quick to cook, nearly everyone likes it and it's a good clean complex carbohydrate to have in your active lifestyle.

But it can get boring and bland if you eat a lot of it. So I try and make it more interesting and fun using the below recipe. In typical Lifestylejeanie style I never measure anything and just make it up as I go along but I'll give you the approximate ingredients here. Feel free to add in any other veggies, spices, or oils you typically use. But the recipe here has been created to include as many healing foods as possible.

We all tend to get run down from time to time and so this is a particularly good staple to make weekly and keep in the fridge to add (hot or cold - just reheat thoroughly) to any meal. All the ingredients are packed full of healing properties particularly the turmeric, ginger, garlic and coconut oil. I've described these in more details below.

It's also great on the go. I typically travel with this as it's perfect at room temperature and stays fresh for well over 12 hours when you're on the move. It is also filling and tasty. What's not to like!


Ingredients:
Portion size of Rice of your choice. I find Basmati and Wild rice are best.
Large handful of organic Spinach
Chopped organic Peppers
Chopped organic Onions
2 cloves (or more!) or diced organic Garlic
1 inch of peeled and diced organic Ginger
1 inch of Turmeric (powdered or fresh)
1 teaspoon of Paprika
3 heaped spoons of organic Coconut Oil
Cracked Himalayan pink salt to taste
Cracked black Pepper to taste

Prep Time:
5 minutes

Cooking time:
10-15 minutes

Method:
Cook the rice as per instructions on your packet.
While it is cooking prep all the veg and spices.
Drain the water once it is cooked and leave in the pan on a low heat.
Add in the Coconut Oil and stir to melt it, coating the rice thoroughly.
In a separate pan with a dash of oil cook the onions, garlic, ginger and turmeric. 
Add in the chopped vegetables and spices and mix thoroughly.
Add the rice to the veggies and mix well.
Season to taste with salt and pepper.


Dietary Information:
Vegetarian
Vegan
Gluten Free
Wheat Free
Sugar Free
Full of healthy vegetables
Garlic is antibacterial and antiviral so excellent for fighting colds and flu.
Ginger is good for digestion issues, nausea, natural anti-inflammatory and boosts the immune system. 
Paprika is high in Vitamin A, E and Iron. It also has anti ageing properties, prevents hair loss and promotes sound sleep.
Turmeric is a natural anti-inflammatory with amazing healing and cancer fighting benefits.
Coconut oil is a healthy fat that doesn't degenerate at high temperatures, heals the lining of the stomach and overall boosts your immunity.
Himalayan Pink Salt has over 84 vitamins and minerals and is low in sodium. Read more about the benefits of it here in this article I wrote. 

Serving Suggestions:
This really is so versatile. It is a lovely side with any main dish, meat, fish, omelette etc.
I recently brought a big bowl of it to a BBQ as a healthy side.
It's colourful and appealing in a cold buffet.
I make a big batch and store it in the fridge to have at a moments notice.
You can also add some protein in to make it a complete meal. Some chopped left over meat an/or some eggs to make it egg friend rice. It is really tasty. Or even nicer some fresh organic prawns! Yum

Storage Instructions:
I keep this in a covered bowl or container for up to a week in the fridge. It also travels well for up to 24 hours.  When reheating ensure it is thoroughly cooked through.

So there you have it guys, cheap, healthy, suits most diets and boosts your overall health. And to boot it tastes delicious!


Tuesday, 31 May 2016

Peanutbutter Cups - A healthier version!

So my Facebook and Instagram news feed went crazy when I posted a picture of a home made Peanutbutter cup that I made. I was inspired by the popular brand available in America. However, I wanted to make one that was healthier, tastier and all round better for you.


As always I didn't follow a recipe but just experimented in the kitchen and came up with this. I have had rave reviews from those lucky enough to try them so I'm hoping you will enjoy them too!


Ingredients:
Makes 12-15 cups
300g of Dark Chocolate (ideally 75% plus)
1 dash of Olive Oil or teaspoon of Butter (real NOT margarine) or Coconut Oil
1 tablespoon of Raw, Organic Honey/Mayple Syrup or leave this out for a lower sugar version.
1 teaspoon of Cinnamon
1 dash of Vanilla Essence or some real Vanilla bean
2 Tablespoons of organic nut butter with no sugar (don't use peanut if staying Paleo) 

Sprinkle of Pink Himalaya Rock Salt (you can read all about the benefits of this here)


Method:
Melt the chocolate gently in a pan with the fat of choice (Oil, Butter or Coconut Oil). You can do this in a glass bowl over a pan with some water or directly in the pan. I find the bowl over water works best and you can keep it melted for longer without burning.
Once it is melted add the vanilla, cinnamon and honey and stir well.
Line some muffin tins with paper cases.

Add a thin layer of chocolate to the bottom of each case, you can shake the tray to evenly spread the chocolate.
Allow these to cool and set in the fridge for about 5 minutes. 

 
Please excuse the state of my muffin tins. They are inherited from my mum and about 20 years old. They have served me well over the years!

Meanwhile leave the bowl of melted chocolate over the hot water (but with no heat from the cooker) and begin to make the filling. 
Take 2-3 heaped tablespoons of your nut butter of choice and place in a bowl. 
Add in a dash of olive oil/coconut oil/melted butter.
Add in some freshly ground pink salt (taste as you go as some nut butters come already salted so add according to taste) and mix well. 
Once the chocolate base is relatively set place a teaspoon or so of nut butter mix onto each base. Spread out and flatten down without touching the side.
Using the still warm and melted chocolate mix fill the paper cases until the nut butter is adequately covered. They will be more shallow than the case.
Again shake or tap the tray to flatten out the chocolate. 
Place in the fridge to chill. 
Eat straight from the fridge or at room temperature depending on your preference!


It really is that simple. It takes minutes to make and I often make a double batch and keep some in the fridge for when I'm feeling like a treat (if they last that long!)


Prep Time:
5-10 minutes

Cooking Time:
None! Just leave to harden in the fridge.

Dietary Information:
Paleo (ish!) the higher % chocolate the better with this
Good fats - from the oil and seeds/nuts/coconut
Full of antioxidants from the high chocolate content
Full of natural sweetness from the honey
Vegetarian
Vegan (if you use coconut oil and dairy free chocolate)
Gluten Free
Wheat Free


Storage Instructions:
I keep this in a sealed container and it will last weeks in the fridge - provided you don't eat it all.


For similar chocolate, no bake treats check out my Choocolate Bark recipe here

Enjoy Jeanies and as always feel free to comment, share and send me pics of your creations!


Monday, 23 November 2015

Chocolate Bark - Paleo (ish!)

So last week I made this chocolate bark for a party I was having. It's coming up to the Christmas Season and so I wanted to have nice and tasty nibbles that weren't going to be leaving people feeling stuffed, over indulged or sick.

I have seen chocolate bark on lots of blogs and recipe sites but never actually made it. I didn't follow any recipe for this and, like most of my recipes, just made it up as I went along using items I had in my house!

For once this actually worked out perfectly first time and it was a massive hit at the party! People couldn't get enough of it. In fact I'm having another dinner party this Thursday and I'm making it for dessert again.


Here's how you can make it too:

Ingredients:
400g of Dark Chocolate (ideally 70% plus)
1 dash of Olive Oil or teaspoon of Butter (real NOT margarine) or Coconut Oil
1 tablespoon of Raw, Organic Honey
1 teaspoon of Cinnamon
1/2 teaspoon of Cayenne Pepper
1 dash of Vanilla Essence or some real Vanilla bean
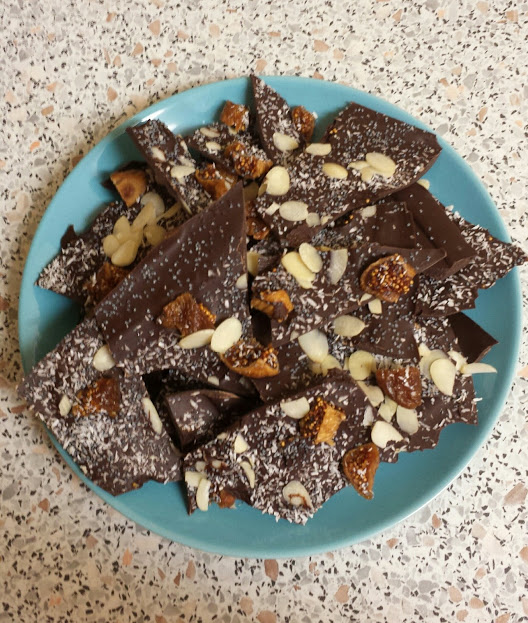
Toppings which can include - Dessicated coconut, dried fruits (no added oil or sugar - I used Figs), chopped nuts (I used sliced almonds), seeds (I used chia seeds), freshly ground sea salt (I used Pink Himalaya Rock Slat)

Method:
Melt the chocolate gently in a pan with the fat of choice (Oil, Butter or Coconut Oil)
Once it is melted add the vanilla, cinnamon and honey and stir well.
Using a flat tray line it with some greaseproof paper.
Spread the chocolate mix evenly on the paper using the back of a spoon or spatula.
Sprinkle on your selected toppings - Fruit, nuts, seeds, salt etc
Allow to cool and place in the fridge to set.
Break into pieces and enjoy!

It really is that simple. It takes minutes to make and I often make a double batch and keep some in the fridge for when I'm feeling like a treat.

I must say it's the combination of the figs and salt in this that really make this. It's almost like salted caramel.


Prep Time:
5-10 minutes

Cooking Time:
None! Just leave to harden in the fridge.

Dietary Information:
Paleo (ish!) the higher % chocolate the better with this
Good fats - from the oil and seeds/nuts/coconut
Full of antioxidants from the high chocolate content
Full of natural sweetness from the fruit and honey
Vegetarian
Vegan (if you use coconut oil and dairy free chocolate)
Gluten Free
Wheat Free

Storage Instructions:
I keep this in a sealed container and it will last weeks in the fridge - provided you don't eat it all.


OK now I need to publish this post fast as I've eaten 4 pieces already writing this as it keeps reminding me of how good it is!

Enjoy!


Tuesday, 22 September 2015

Tuesday's Change Week 39 - Let them Eat Cake!

It's out 1st Birthday here in Lifestyle Jeanie and what a year it has been. I am so proud of the last year and so grateful to all of you, the followers, for your feed back, questions, comments and loyality. It just makes me so happy to hear people saying they made one of my recipes or did a work out I suggested. The aim when I started this blog was to help even just 1 person feel better about themselves so this goal has most certainly been reached and surpassed!


As it's celebration time then how fitting to have cake as this week's Tuesday's Change. Now don't get too excited. This is not an excuse to eat cake everyday! You're not that lucky. But it is an opportunity to try some new recipes and begin to reduce and eliminate the amount of sugar and processed foods you make.

This week I want you to replace traditional sweet cakes, biscuits or desserts with some wholesome, healthy and clean eating recipes.

Here are some of my favourite ones to chose from.

Paleo Lemon and Blueberry Loaf


Sweet Summer Treats-Chocolate Covered Fruit


Coconut and Mango Drizzle Cake


Paleo Chocolate Mousse


Carrot Cake Muffins


So it really is that simple this week. Ditch the shop bought sweet treats, roll the sleeves up and get making some sweet, natural, wholesome and tasty treats!

Enjoy!


Paleo Lemon and Blueberry Loaf

I, like many people, just love to watch the Great British Bake Off. It's just such an entertaining show and it's one that encourages people to get back into the kitchen! What more do you need? Now if you are anything like me you will need to watch this show stuffed to the brim or have some nice healthy cakes to hand. Otherwise you will spend the entire show drooling and/or repeatedly going to your cupboards hoping some baked creation will have magically appeared.

To prevent such sweet cravings I try and have some sort of cake made and waiting to fill the void. I recently tried this lemon and blueberry loaf and really enjoyed it. It's light and tasty with just enough stodge to satisfy. It is moist and so easy to make and keeps for a few days (if you don't polish it off in one sitting!)


Ingredients:

1 1/2 cups of ground almonds
1/4 cup of dessicated coconut
1 teaspoon of gluten free baking powder
1/4 teaspoon of sea salt
4 organic, free range eggs
1/2 cup of organic coconut oil - melted (Cold pressed/Extra Virgin if possible)
1/3 cup of raw honey (organic and local ideally)
Juice of 1 lemon (organic and unwaxed)
Zest of 2 lemons
1 - 1 1/2 cups of organic blueberries

Optional glaze:
1/3 cup of full fat butter - melted
2 tablespoons of softened coconut oil
2 tablespoons of raw honey
2 tablespoons of lemon juice


Method:

Preheat the oven to 180 degrees C or Gas Mark 4.
Mix all the dry ingredients together except for the blueberries.
Slowly add in the wet ingredients, one egg at a time.
Ensure the batter is mixed thoroughly.
Line a bread loaf tin with greaseproof paper.
Place 1/2 the batter in the tin. Using 1/2 of the blueberries place them gently on top of the batter.
Cover with the remaining batter and then the remaining blueberries.
Cook in the oven for 30-35 minutes covering with foil if turning too brown.
When it is cooked allow it to cool on a wire rack.
If you wish to use the glaze then mix all ingredients together and once the loaf is fully cool drizzle the glaze over the top and allow it to soak into the cake.
Slice and enjoy!

Prep Time:
5-10 minutes

Cooking Time:
30-35 minutes

Dietary Information:
Paleo
Gluten Free
Wheat Free
Sugar Free
Diary Free
Vegetarian
Good Fats
Blueberries are one of your 5 a day and provide many anti oxidants which are great for repairing and healing resulting in better skin, hair, nails and overall health.


Storage Instructions:
Like most cakes this is best eaten warm from the oven! But it will keep for a few days in a sealed container. If you have good will power you could slice the loaf and freeze in individual slices to be defrosted and eaten when wanting a quick treat!

Enjoy this dish guys. I really do and it definitely fills a gap for stodgey, sweet treats without breaking free from eating clean.


Wednesday, 2 September 2015

Paleo, Italian, Summer Salad


The kids might be back to school and the Sunday evening, sandwich making ritual may have begun but I for one REFUSE to believe summer is over! To make myself feel more summery I decided to experiment with some summer flavours recently and invented my Paleo, Italian Summer Salad.


This is light, tasty, fills you up and takes just minutes to prepare. Even my 'Salads don't fill me up, can I have Chips too?' husband approved of it and said he really enjoyed it. (Spot his chips in the pictures below!)  Here's how you can make it too.


Ingredients:

Chicken/Turkey/Beef (meat optional as always!)
Good Quality Extra Virgin Olive Oil
Squeeze of lemon juice
Rock Salt
Freshly ground black pepper
Freshly chopped Basil, Rosemary, Thyme (I grow these 3 easily and cheaply on my windowsill) 
Sliced fresh mozzarella (comes in a bag of fluid)
Organic vegetables of choice. Here I used:
Rocket
Cherry tomatoes
Yellow and Orange Peppers
Cucumber 
Mustard and Balsamic optional.


Method:
Time allowing, chop your meat and leave it marinade in a few dashes of olive oil, lemon juice, salt, pepper, basil, rosemary, thyme. Thoroughly coat all the meat and allow to rest for as long as you have! If you don't have time to marinade just quickly toss the meat in the ingredients and move onto the next step.
Chop all your veggies and arrange as you feel fit on your plate.
On a low, gentle heat in a cermanic pan, cook the meat including oil, herbs and seasoning until fully cooked. 
Slice mozzarella into strips or chunks.
Arrange chicken and mozarella to the side of veggies or on top.
Using any excess juice left in the pan add some balsamic vinegar and a spoon of honey mustard to make a lovely dressing served on the side or drizzled over the top.
Enjoy as is or serve with crinkled oven chips for your husband!


The best thing about this recipe is it's quick and easy to make double portions. I usually make enough for 3 and keep some of everything to the side so I can take it for my lunch the next day. This massively cuts down on waste, time and effort and ensures you have a healthy meal ready to go for the next day.


Prep Time:
5 minutes, more if you marinade

Cook time:
15 minutes or as long as the meat is safely cooked

Dietary Information:
Gluten Free
Wheat free
Sugar Free 
Paleo 
High in protein
Vegetarian - leaving out the meat. Add nuts or more cheese instead.
Olive Oil is full of good fats, Omega 3s and excellent for hair, skin and nails.
Rosemary boosts immunity, increases circulation, aids digestion, is an excellent anti-inflammatory - great for asthmatics - and increases concentration. 
Basil helps clear skin, alleviates stress and worry and boost your mood.
Thyme is a natural disinfectant helping to fight bugs and bad bacteria in the body, lowers blood pressure and helps with coughing.


Enjoy this light, refreshing and satisfying salad anytime of day. And stay strong Jeanies! Summer is NOT over!


Monday, 17 August 2015

Tuesday's Change Week 34 - Roam Free


You might have seen a discussion that started on my Facebook page recently over the difference between battery farmed/caged chickens and free range, organic chickens and the subsequent eggs they produce. I hope you all learned something new and if you missed it let me elaborate here.


Animal rights aside (I won't get into that discussion here!) the health benefits of eating properly reared animals and their by-products are vast. Take eggs for example.


Organic, Free Range eggs have been proven to contain:

  • Twice as much omega-3 fatty acids.
  • Three times more vitamin E.
  • Seven times more pro-vitamin A beta-carotene.
  • A quarter less saturated fat.
  • A third less cholesterol
than caged or indoor chickens. (Source can be found here)

Now if that's not enough of a reason to buy Organic, Free Range eggs I don't know what is! - Oh yes that's right it's also kinder to the animals!

Female chicks are grown in extremely cramped and dark conditions and fed a processed diet full of hormones, pesticides and antibiotics. Once they reach laying age, they are put into cages less than half the size of an A4 sheet of paper, their feet often become deformed as a result.

Not only is this cruel and harmful it is not healthy for the chickens, their eggs and as a result, for you.


Unfortunately, some large-scale egg farmers have exploited lax definitions of free range chicken and have been able to use this label, even when they only allow their confined chicken out occasionally to concreted areas. See above. 
These are not true free range eggs. For this reason I always buy Free Range AND Organic. 
So your Tuesday's Change for this week is to switch to Organic, Free Range eggs. Eat as many as you like. I often eat up to 6 eggs a day. I have healthy hair, skin, nails, strong muscles and bones and NO my cholesterol is not through the roof. That is an absolute MYTH!
And you don't have to stop here. I urge you to start looking at where all your produce comes from. How are the animals treated? Are there unnecessary and dangerous chemicals being passed on through the food chain to you? 

For my followers in Ireland I know Dunnes Stores do 6 Organic Free Range eggs for €1.99 (just 10c more than their non Organic ones!). For my German followers Rewe do Organic and Free Range eggs again 6 for €1.99.
I know the English Market in Cork has a Chicken stand where the animals are all antibiotic free, free range and live happy lives. They have really competitive prices too! Wherever you live try and find a place where you're sure the chickens are healthy and happy!
My biggest advice is start to looking at where your food comes from. Get to know your suppliers and farmers. Question everything. For your health and those of the animals!